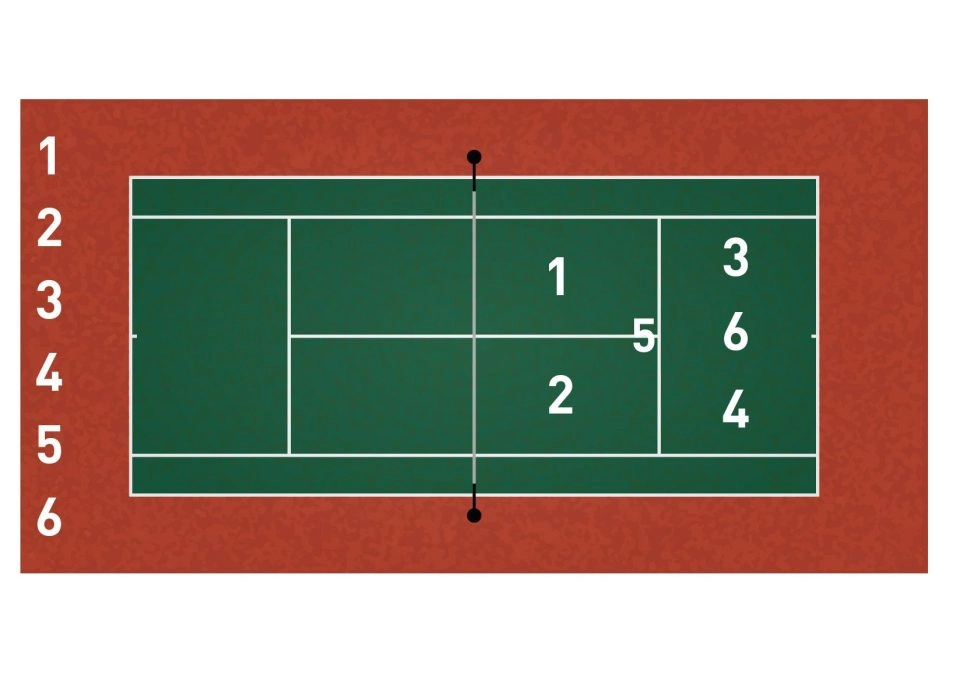
Return of serve technique in tennis

Return of first serve

Here is the court that we will use as a reference with different zones to be discussed.

Position-retour-1

From position n°1: On a first, quality ball when you’re not in an extreme position, favor zones 4 and 6. First, notice on the diagram that zone 4 is the furthest from our position, leaving us with a fairly large margin so that our ball will cover more ground. As well, the server will head in your direction after serving, making it harder for him to double back in the opposite direction. Not to mention that the ball will escape him in zone 4, whereas if we hit to zone 3 the ball would go straight towards him. Zone 6 will allow us to neutralize our opponent and put him in a tough spot. Without the correct angle, he’ll have a harder time increasing his advantage on the second hit. On a fast serve, we’ll need to shorten our preparation, making it difficult to carry out a lift. Instead, use the ball’s speed to counter: the return will be relatively fast even without effects and at average height.

If the opponent has an excellent serve and you’re left with no other solution, right-handers should release the left hand to gain distance and reach the ball. If possible, try to reach zone 2 by playing a low, hard to hit ball (picture Roger Federer who perfectly masters this shot and uses it often.) Otherwise, try to play high and long again, as best you can.

From position n°2: On a good first ball, the best solution in most cases will be to return the serve to zone 6. Because of the difficult angle, it is tricky to attempt anything. A quality return hit long and low can be an impressive move since your opponent will be inside the court after serving. Novak Djokovic, the best returner of serves in the world, often uses this return zone.
If the serve is difficult to return, favor the backhand side because it is easier to hit a ball that’s close to the body with a backhand. Zone 2 can be very effective in this case.

From position n°3: On a good first serve, keep zones 4 and 6 in mind. Zone 4 for several reasons: the server’s ball will reach your racket quickly because of the short distance making it difficult to plan your hit in advance and subsequently to shoot crossed to zone 3. As well, like from position 1, the opponent will fall slightly to his right after serving and will have a harder time heading back towards his left. If it is a particularly good serve, favorize zone 6 for more security.

From position n°4: Use the same principles as for position n°3. Zone 3 should be favored because the opponent will be caught on the opposite foot and thus have a hard time planning his hit in advance. Use zone 6 if it is a particularly good serve.

From position n°5: like for position n°2, it will be difficult to hit in a way that puts your opponent at a disadvantage. Aiming for zones 1 and 2 with a backhand slice is a good option against an opponent with a great serve.

From position n°6: same as position n°1. We can hit to the back of zone 3! Without holding back, we can hit a deep shot as the opponent repositions himself. For a right-handed player, zone 1 is the easiest option for sending the opponent off court.

When the opponent executes a volley serve, we frequently seek out zone 5 in order to carry out a low, two-part passing shot. Since the opponent will be far from the net, there’s no need for the first passing shot to be perfect. Zones 1 and 2 can also be used if the hit isn’t too hard. Avoid hitting long.


Return of second serve

From position n°1: If you are confident in your shot, you can attack the opponent’s serve. Between zones 2 and 4 is a good option since your ball can cover more distance and in theory your opponent will be caught slightly off balance. If you opt for the return volley, aim instead for zone 3 since, according to angle theory, you’ll have less ground to cover to get to the right spot at the net (slightly to the left.) As well, zone 6 can be used to remain grounded.

From positions n°2 and n°5: The body serve can be difficult to handle. Heading towards the ball, it will likely be difficult to thrust further forward and subsequently control the ball. For this reason, take the biggest margin of error possible when the opponent hits a destabilizing serve. Don’t hesitate to hit hard to zone 6, whether or not you approach the net.

From positions n°3 and n°4: we are in a pivotal position. One option is to finish the point on the return by playing down the line (zone 4 from position 3 and zone 3 from position 4) as the opponent repositions himself.
That being said, it is better to play crossed (zone 3 from position 3 and zone 4 from position 4) if you plan on approaching the net, always following angle theory. Zone 6 can be used as well. You’ll be less exposed to a passing shot down the line.

From position n°6: for a right-handed player, this serve plays to the forehand which is often a strong point. You can use it to take the advantage. Zone 1 is a great option for overwhelming your opponent. If you intend to approach the net, zone 6 is the best option. If you approach zone 4, the ball will get closer to your opponent, leaving your entire left side open.
If your opponent has a strong second serve, you can return far from the line in order to maximize length along the diagonal. If he approaches the net, make sure to follow suit and aim primarily for zone 5.

On a second kick serve (that soars high after the bounce), the goal is to reach the ball as it lifts in order to improve your angle and target the right zone. On a second slice serve, this tactic will be complicated, and it is best to aim for long zones.
Remember that for each of these serves, you must physically commit 100% to hitting the ball. An aggressive game plan won’t suffice if you approach the ball timidly. Nothing works better for clenching a return than fully committing to it.

Adapt this information according to your own strengths and your opponent’s weaknesses. Take all observable factors into account. On a clay court, take advantage of the short return zones. Use your strengths and add a surprise element to your game by changing up your zones from time to time!

Have a good match!

Suggested articles